2 “Small” Changes That Unlock Big Squat Gains

The Scenario
You’re trying to squat using the Starting Strength method. You’re excited about the low bar squat.

You’ve read the book. You’ve watched the videos . . .

But you’re still struggling to execute the lift correctly.

Here are two simple cues that just might make all the difference.

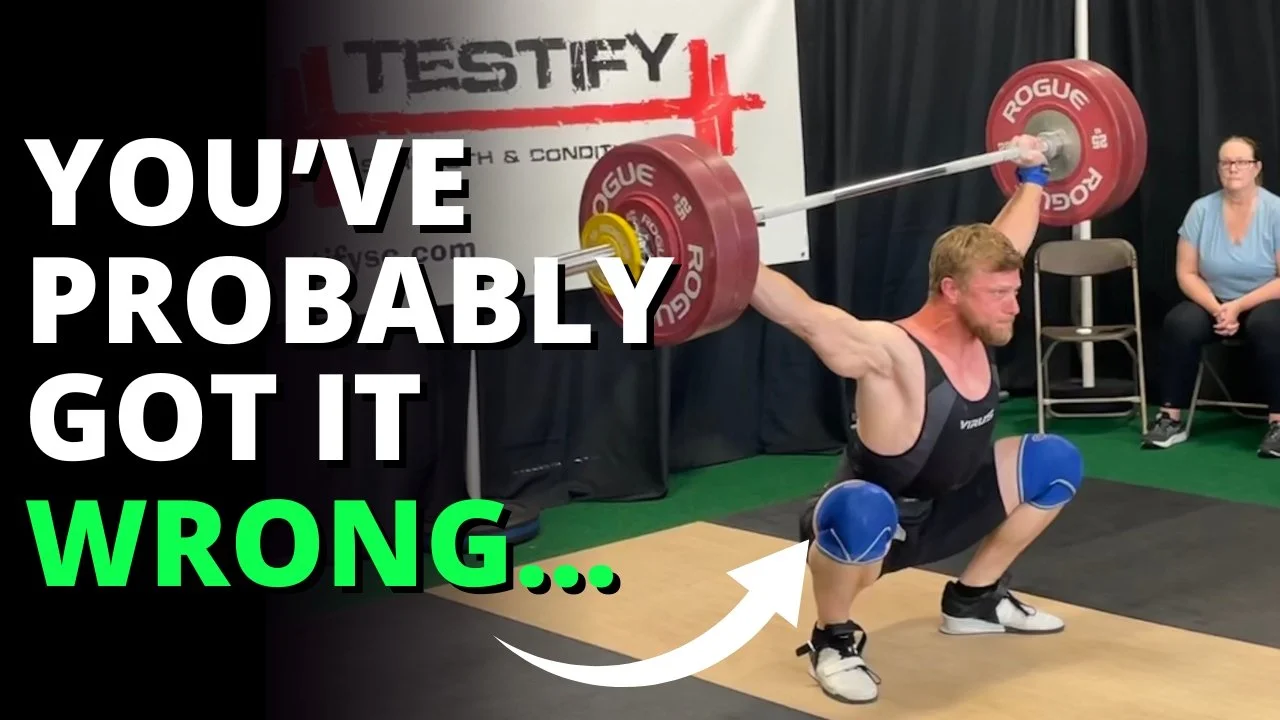
figure 1: This fool is keeping his back angle too vertical as he starts his descent.

The Problem is Two-Fold
When lifters are having difficulties with the squat, the problem often consists of two factors - achieving the correct back angle on the way down and then maintaining that correct back angle on the way back up again.

In other words, the lifter usually is keeping his torso too vertical on the descent (Figure 1), and he isn’t correctly driving with his hips on the ascent.

Let’s fix this real quick-like.

Check out the video above if you want to see the solution in action.

The Solution: Option #1
On the descent, cue yourself, “Lead with the chest.”

You are reminding yourself to start pointing your chest at the floor right away as you start to descend (side note - you’ll need to reach backward with your hips to do this).

figure 2: becky correctly points her chest at the floor as she descends.

On the ascent, however, use the cue, “Lead with your hips.”

In other words, you are cueing yourself to drive your hips straight up out of the hole, and you are specifically not thinking about what your chest, shoulders, the barbell, or anything else is doing (don’t worry - they’ll go up, too).

So, to summarize, “lead with the chest” on the way down (Figure 2), and then “lead with the hips” on the way back up.

The Solution: Option #2
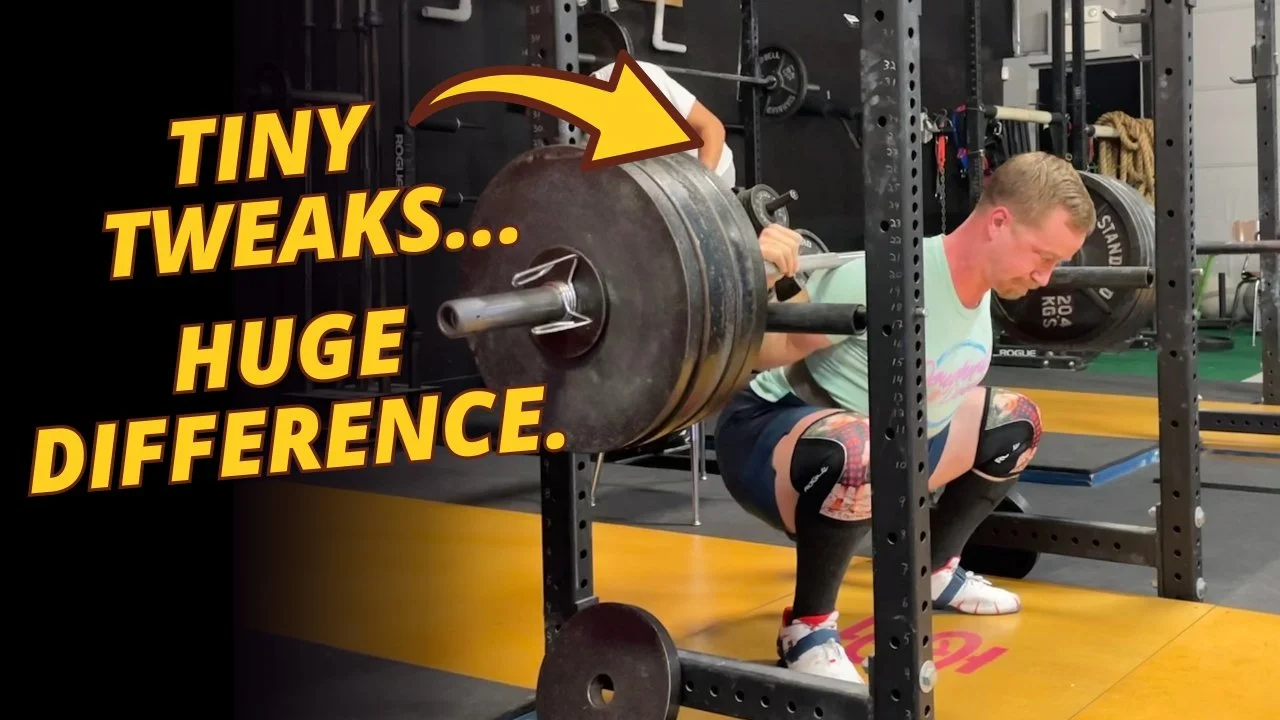
If you struggle with the concept of driving your hips upward on the ascent, use the cue “Keep your chest down” instead for this portion of the lift (Figure 3).

In this case, your cue for the descent is still “lead with the chest,” and your cue for the ascent is now “keep your chest down” (or equivalently, “stay leaned over”).

figure 3: tyler correctly keeps his chest pointed at the floor for a good portion of his ascent.

These solutions are quick, simple, and as always, we hope they help you get stronger and live better.

-Phil

PS: Whenever you want even more Testify in your life, here are some free resources:

  • Book a free intro and strategy session with us HERE.

  • Pick up a free copy of Testify’s Squat Guide: 12 Tips to Improve Your Squat Now HERE.

  • Get our free weekly email - containing useful videos, articles, and training tips - HERE.

  • Follow Testify on Instagram HERE.

  • Subscribe to Testify’s YouTube channel HERE.

(Some links may be affiliate links. As an Amazon Associate, Testify earns from qualifying purchases.)


At Testify, we offer small group training, private coaching (in-person or remotely via Zoom), online coaching, and form checks. Interested in getting stronger, looking better, and having more energy?

DIY Lifting Platform - Easy and Fast!

(A Blast from the Past article originally posted on 06/02/23)

Let’s build a lifting platform . . . fast. We’ve got the steps below, and be sure to watch the included videos to see the process in action.

Why You Should Have a Lifting Platform
You want a lifting platform for several reasons - first, it protects your equipment. Specifically, it protects your plates and the floor from chipping, cracking, and/or breaking due to deadlifting, cleaning, snatching, rowing, etc. Second, it’s great for noise and vibration dampening, which is important when you’re lifting while your 2-year-old is sleeping, and it’s also important so that you don’t annoy your neighbors. Finally, a platform is useful for safety - it clearly delineates your lifting space. When you’re on the platform, it says, “Hey, this is someone’s lifting space - stay off the platform.”

How to Build It
“Build” is an aggressive term. Putting together a platform is pretty simple - so much so that “assemble” is probably more appropriate. Here we go:

Step 1: Base Layer
Take two ¾” x 4’ x 8’ sheets of OSB and set them down on the floor side-by-side. These sheets run lengthwise, i.e., “front-to-back” in terms of your platform’s orientation (Figure 1).

Note: These sheets are commonly referred to as ¾” thick, but the actual thickness is 23/32” and will be listed that way at the lumber store.

IMPORTANT: Most sheets have a slight bow or “crown” to them. When setting them down, be sure that the crown is up. In other words, you want the sheet to make a hill, not a valley. If you do this, the weight of the entire platform itself helps remove any bowing from the final product.

Step 2: Middle Layer
Take two more ¾” x 4’ x 8’ sheets of OSB and set them on top of the base layer so that they run perpendicular to the base layer’s sheets, i.e., “side-to-side” in terms of your platform’s orientation (Figure 2). Attach the middle layer to the base layer using 1 ¼” screws - we use 3 screws along the short edge of each sheet and 4 screws along the long edge of each sheet.

Step 3: Top Layer - MDF
Take a ¾” thick sheet of MDF and cut it so that it’s 96” x 42” (i.e., 8’ x 3.5’). MDF comes in 97” x 49” sheets, and you can either have your lumber supplier do it for you (Lowe’s typically does this for free), or you can do it yourself. We like MDF as it’s relatively heavy, sits nice and flat, and because of this, it helps remove any bowing from your platform. With that said, you can also use something nicer like oak for the top layer.

Using 1 ⅝” screws, attach the MDF to the middle layer so that it’s perpendicular to that layer (i.e., the MDF will run “front-to-back”) and centered. The MDF should sit so that it’s 27” in from either side of the platform. We use 3 screws down each long edge for a total of 6 screws. Be sure that the screws are slightly countersunk so that you don’t damage your plates if you accidentally set the bar down a bit off-center.

Step 4: Top Layer - Horse Stall Mats
Get three ¾” x 4’ x 6’ rubber horse stall mats. Ideally, you want mats without any type of pattern or texture on them, but if they are dimpled on the bottom, it’s not the end of the world. Using a jig saw (watch the video), cut two 72” x 27” pieces (i.e., 6’ x 2’3”) and two 24” x 27” pieces (i.e., 2’ x 2’3”). Thus, you now have two long pieces and two short pieces of horse stall mat.

Set one long piece and one short piece on the left side of the MDF and repeat the process on the right side of the MDF (Figure 3). Make sure the rubber mats fit tight and snug up against the MDF as well as each other, then attach the mats to the middle layer using 1 ⅝” screws (Figure 4), and again, be sure to countersink them slightly. We put screws around the outside, front, and back edges of the mats. However, don’t put screws on the edge near the MDF - this will help ensure that you don’t accidentally set your plates down on a screw that’s a bit proud.

There you have it - your very own lifting platform. It’s easy, it’s quick, and it’s incredibly durable.

As always, we hope this helps you get stronger and live better.

-Phil

PS: Whenever you want even more Testify in your life, here are some free resources:

  • Book a free intro and strategy session with us HERE.

  • Pick up a free copy of Testify’s Squat Guide: 12 Tips to Improve Your Squat Now HERE.

  • Get our free weekly email - containing useful videos, articles, and training tips - HERE.

  • Follow Testify on Instagram HERE.

  • Subscribe to Testify’s YouTube channel HERE.

(Some links may be affiliate links. As an Amazon Associate, Testify earns from qualifying purchases.)


At Testify, we offer small group training, private coaching (in-person or remotely via Zoom), online coaching, and form checks. Interested in getting stronger, looking better, and having more energy?

Why Waiting Until Monday Is for Quitters

The Scenario
It’s July, so January 1st has come and gone by a long shot, and so has your New Year’s resolution of consistently training. 

Not a problem. Today is Wednesday, and you’ve told yourself the following . . .

“Self, I’m kicking it off next week.”

“Come Monday, I am going to get this thing going.”

“The gainz train starts on Monday!”

Don’t do this to yourself. Monday is the worst day to start training - the absolute worst.

How Can This Be True?
Am I being mildly facetious? Of course I am - my training week typically starts on a Monday. However, the point still stands - the reason why Mondays are so terrible is that when people miss a training session (and specifically the start of the training week such as a Monday or Tuesday), they get to the middle of the week and - instead of simply going in and continuing their training - they often give up on the rest of the week.

This is usually paired with inner dialogue along the lines of “Well, I didn’t get my training started this week the way I meant to, but I’ll definitely get it going next week.”

This is a big problem for two reasons.

Problem #1
If you skip the rest of the week, you’re missing out on perfectly good training days and the progress that would have come with them. If you typically train Monday, Wednesday, and Friday, but this week you missed Monday, you can still get quality training done on Wednesday and Friday.

Missed Monday and Wednesday? Training on Friday or Saturday is still better than waiting until Monday. Better by far.

In suboptimal circumstances, training is not all or nothing. It’s all or something.

You don’t stop brushing your teeth for the rest of the week simply because you fell asleep before brushing them on Tuesday night. You wake up the next morning, brush your teeth, and continue with your life. Training is the same. Just go train.

Problem #2
The more insidious problem is that, by deciding not to train for the rest of the week, whether it’s Wednesday, Thursday, Friday, etc., you have now decided to practice skipping workouts.

You have now decided to make skipping workouts your new habit.

You’re practicing the very habit you’re trying to avoid - that of missing training sessions.

The Solution
Don’t complicate this and don’t wait. If it’s too late to train today, grab a barbell tomorrow and train.

The bar weighs the same seven days a week, and putting off your training another day or two only reinforces the habit you want to eradicate.

Need an extra kick in the pants? Remember that if you have kids, you are either demonstrating - whether you mean to or not - how to get back on that horse . . . or how to just stay down.

Don’t wait for the calendar’s merry-go-round to bring Monday back around to you.

Get back on that horse. Today. It might be tough to walk in the door of the gym, but by the time you walk out, you’ll be glad you did.

As always, we hope this helps you get stronger and live better.

-Phil

PS: Whenever you want even more Testify in your life, here are some free resources:

  • Book a free intro and strategy session with us HERE.

  • Pick up a free copy of Testify’s Squat Guide: 12 Tips to Improve Your Squat Now HERE.

  • Get our free weekly email - containing useful videos, articles, and training tips - HERE.

  • Follow Testify on Instagram HERE.

  • Subscribe to Testify’s YouTube channel HERE.

(Some links may be affiliate links. As an Amazon Associate, Testify earns from qualifying purchases.)


At Testify, we offer small group training, private coaching (in-person or remotely via Zoom), online coaching, and form checks. Interested in getting stronger, looking better, and having more energy?

4 Gym Tips No One’s Talking About

(A Blast from the Past article originally posted on 03/19/21)

When you’re new to some task, like lifting, there are always a few tips and tricks that will seem rather obvious to you years later, so in an effort to speed things up a bit, here are several that might prove useful to both new and experienced lifters:

figure 1: An additional use for your wrist wraps

Deadlifting on a Non-level Floor
If you must deadlift on a slightly non-level floor (hopefully very slightly!), and you find that the barbell always wants to roll a bit, you can simply place your wrist wraps on the floor in front of the plates (Figure 1).

You can, of course, use any other soft, thin items like socks, lifting straps, even sponges, but don’t use a hard item like a 2.5-lb plate. If you set the bar down, and it glances off that item, it will come back at your shins, and shins and horizontally moving barbells don’t get along well (hint: the barbell always wins). In addition, the contact between the plate(s) on the bar and the 2.5-lb plate on the floor may cause one or both of them to chip. Wrist wraps are thick enough to immobilize the bar but soft and compressible enough that setting the bar down on top of the wrist wraps won’t cause any problems.

Quit Using 2.5-lb Plates . . . Sometimes
Stop using 2.5-lb plates in your warm-ups. As you get stronger, you’ll find that you can round most - if not all - of your warm-up weights to numbers that end in “5.” This will allow you to stop using 2.5-lb plates in your warm-ups.

If you’d like to use 2.5-lb plates in your final warm-up in an effort to be a bit more precise, that’s fine, but most of your warm-up weight selections won’t require this level of precision. (If your work sets on a given lift are less than 100 lbs, you might decide to use 2.5-lb plates more often in your warm-ups, but you can apply a similar exclusionary logic to the 1.25-lb plates instead.)

Stop Resting . . . Sort-of
Stop resting between your warm-ups sets. We mention this on a regular basis, but it still blows people’s minds that they don’t need to rest 5 minutes between every single set.

Do your empty bar sets (alright, you can rest 15 seconds between your two empty bar sets of five reps), then add weight and go. Then add weight and go again. Repeat until it’s time for your first work set, before which you should probably rest a few minutes. Remember - the act of changing the weight on the bar gives you enough rest to do the next warm-up set. This will save you a lot of time in the gym.

Write Out Your Next Workout
Write out your next workout before leaving the gym. As you gain experience, you may ditch this habit, and that’s perfectly fine, but when you’re new, it’s a very productive use of your rest periods to start writing out your next workout in your training journal - especially the warm-ups. You’re already in “training mode,” and the warm-ups you performed today will inform and influence the warm-ups you do next time, so now is as good a time as any to write out your next training session (and you won’t have to think too hard when you come in the gym next time).

As always, we hope these tips and tricks help you get stronger and live better.

-Phil

PS: Whenever you want even more Testify in your life, here are some free resources:

  • Book a free intro and strategy session with us HERE.

  • Pick up a free copy of Testify’s Squat Guide: 12 Tips to Improve Your Squat Now HERE.

  • Get our free weekly email - containing useful videos, articles, and training tips - HERE.

  • Follow Testify on Instagram HERE.

  • Subscribe to Testify’s YouTube channel HERE.

(Some links may be affiliate links. As an Amazon Associate, Testify earns from qualifying purchases.)


At Testify, we offer small group training, private coaching (in-person or remotely via Zoom), online coaching, and form checks. Interested in getting stronger, looking better, and having more energy?

Snatch vs Power Snatch vs Hang Snatch - What's the Difference?!

Snatch, hang snatch, power snatch, hang power snatch - what are the differences between these lifts, and how can we remember these differences in an easy and practical manner? To sort this out, we first need to understand two words - hang and power.

HANG
Hang refers to a starting position, so if you see the word hang, then you know the lift starts with the bar hanging in your hands. Common hang positions include the mid-thigh, low thigh, above the knee, below the knee, and even mid-shin, but most often (without any other specific qualifiers), hang typically refers to a start position at the mid to low thigh.

Finally, note that if you don’t see the word hang, then you know the lift starts with the bar resting on the floor.

POWER
Power refers to a landing position (AKA receiving position), i.e., the position in which you catch or rack the bar. When you see the word power, simply think partial squat (tip: power and partial both start with the letter “p”). Thus, if you see the word power, you’re going to receive the snatch in a partial depth overhead squat. If you don’t see the word power, then you know you’re going to receive the snatch in a full depth overhead squat.

Now that you’ve got those two terms down, it’s time for the actual lifts . .

SNATCH (AKA squat snatch or full snatch)
Since you don’t see the word hang, the bar starts on the floor, and since you don’t see the word power, it’s not received in a partial squat and is therefore received in a full depth overhead squat before being stood up. 

In summary, the snatch starts with the bar on the floor, the bar is accelerated upward, it is received in a full depth overhead squat, and then the lifter recovers (i.e., stands up).

POWER SNATCH
You don’t see the word hang, so the bar starts on the floor, but you do see the word power, so the bar is received in a partial depth overhead squat.

In summary, the power snatch starts with the bar on the floor, the bar is accelerated upward, it is received in a partial depth overhead squat, and then the lifter recovers.

HANG SNATCH
You see the word hang, so the bar starts hanging in the lifter’s hands, but you don’t see the word power, so the bar is received in a full depth overhead squat.

In summary, the hang snatch starts with the bar hanging in the hands, the bar is accelerated upward, it is received in a full depth overhead squat, and then the lifter recovers.

HANG POWER SNATCH
Not surprisingly, this is a combination of both the hang snatch and the power snatch - the love child of both of those lifts. You see the word hang, so the bar starts hanging in the lifter’s hands, and you also see the word power, so the bar is received in a partial depth overhead squat.

In summary, the hang power snatch starts with the bar hanging in the hands, the bar is accelerated upward, it is received in a partial depth overhead squat, and then the lifter recovers.

By knowing what hang and power mean - and knowing what it means when those words aren’t present - you’ll be able to consistently figure out these variations of the snatch. As always, we hope this helps you get stronger and live better.

-Phil

PS: Whenever you want even more Testify in your life, here are some free resources:

  • Book a free intro and strategy session with us HERE.

  • Pick up a free copy of Testify’s Squat Guide: 12 Tips to Improve Your Squat Now HERE.

  • Get our free weekly email - containing useful videos, articles, and training tips - HERE.

  • Follow Testify on Instagram HERE.

  • Subscribe to Testify’s YouTube channel HERE.

(Some links may be affiliate links. As an Amazon Associate, Testify earns from qualifying purchases.)


At Testify, we offer small group training, private coaching (in-person or remotely via Zoom), online coaching, and form checks. Interested in getting stronger, looking better, and having more energy?

The Best Way to Put On a Lifting Belt! (and a secret weapon)

(A Blast from the Past article originally posted on 05/26/23)

A lifting belt is an extremely useful tool for your strength training, and within a month or two of starting to train, you should be using one regularly. Putting on a lifting belt, however, can be a bit tricky, so let’s sort this out.

How to Do It
There is one way - that’s right, just one - to put on a belt correctly, and it involves the upright of your squat rack. The photos here show a double-prong belt in use, but the method works just as well for single prong belts (in fact, it’s slightly easier). The steps are below, and to learn it even quicker and better, watch the included video.

  1. Put the nose of your belt through the buckle and wrap the nose of the belt around the upright.

  2. Lean away from the upright. Be sure to lean away so that your hips move away from the rack as well (Figure 1); don’t lean away like you’re trying to avoid a punch (Figure 2).

  3. Twist your body away from the rack. For example, if the nose of the belt came around the right side of your body, twist to your left (Figure 3). This will tighten up the belt.

  4. Put the prong(s) through the appropriate hole(s).

Taking off the belt is much the same as putting it on - wrap the nose around the rack, lean away, twist to loosen, and then remove the prong(s).

Squat Stands vs Squat Racks
If you have a squat stand (free-standing, two uprights) instead of a squat rack (anchored to the floor, four uprights), it may tip toward you when you lean away. This is bad. However, it’s an easy problem to solve. Simply place your foot down on the far side of the floor support, and you’ll be able to keep the squat stand anchored in place.

Secret Weapon
I told you there’s only one way to put on a belt, and this is true . . . mostly. If you’re at a meet, you might not have a squat rack handy when you’re about to step on the competition platform. Oh, you’ll have plenty of racks in the warm-up room, but there will quite possibly be none near the competition platform. Here’s what you do (and again, watch the video above to see this in action):

  1. Put the nose of your belt through the buckle.

  2. Place the pointed end of a screwdriver through one of the holes of the belt (Figure 4).

  3. Grab that end of the screwdriver (don’t impale yourself), and pull back, treating the screwdriver as a lever (Figure 5). This will get the belt as tight as you like.

How Tight Should Your Belt Be?
When you’re new to wearing a lifting belt, it should be uncomfortably tight. If it’s comfortable to wear and easy to wiggle around, it’s merely a fashion accessory. Don’t let your belt be a fashion accessory. With practice, what was uncomfortably tight at the beginning will simply feel correct.

Need to Buy a Belt? Watch This First.
If you’re getting ready to buy a lifting belt, I’d recommend watching the included video here to get a good sense of what to look for when purchasing one. You’ll also find some links below to a few belts we recommend to our members.

Belts
My belt is from Best Belts, and I’d love to recommend them to you, but as of May 2023, they're backlogged and aren't taking orders, so with that in mind, here are a few belt options we often recommend:

(Some links may be affiliate links. As an Amazon Associate, Testify earns from qualifying purchases.)

As always, we hope this helps you get stronger and live better.

-Phil

PS: Whenever you want even more Testify in your life, here are some free resources:

  • Book a free intro and strategy session with us HERE.

  • Pick up a free copy of Testify’s Squat Guide: 12 Tips to Improve Your Squat Now HERE.

  • Get our free weekly email - containing useful videos, articles, and training tips - HERE.

  • Follow Testify on Instagram HERE.

  • Subscribe to Testify’s YouTube channel HERE.

(Some links may be affiliate links. As an Amazon Associate, Testify earns from qualifying purchases.)


At Testify, we offer small group training, private coaching (in-person or remotely via Zoom), online coaching, and form checks. Interested in getting stronger, looking better, and having more energy?